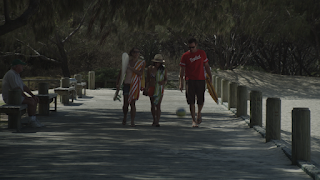
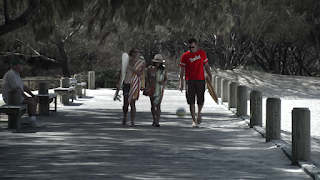
On this entry, I'm going to show you how to do tracking and keyframing.
Sample 1:


So the first thing you need to do is to (always) balance the colors first. First node is always to balance. In the samples shown above the (balanced) original photo is on the left while the edited photo is on the right.
So what we're going to do is to enhance the red shirt of the guy and make it stand out more. Create a second node de-saturate everything a little bit then create a layer node. On the layer node, go to window (small circle) then choose the curve tool (where the arrow is pointing) to masked out the shirt of the guy. It doesn't matter if you masked it perfectly or not as long as the focus is the shirt itself.
Then go to curves and go to Hue vs Sat. and pick the color of the shirt then you can increase the saturation of the red shirt without touching the others.
Make sure that you don't overdo it because noise will start to appear like the one shown above. Those are the colors that you didn't or wasn't able to pick properly, so you have to be careful. Layer node works in priorities, it will prioritize the color that was isolate then apply it to the succeeding nodes.
To track the curve tool that we used, go to tracker then click the play it forward. It will automatically tracked the movement of the image until the end. You can manually adjust the curves tool by moving the points and if you're in the frame mode, it will automatically add key frames to the track.
You can adjust the keyframes in this part as well and also to check the flow of the footage/s.
Sample 2:
We're going to do the same thing to this example. After balancing, we can still see that the image is a bit plain sad.
So what we're going to do is to drag both gamma and gain to yellow/orange to make it look warmer. Make sure that you don't do it too much so it could still look beautiful and natural. As you can see, the color that we added affected the white areas of the jeepney.
In order to retain the color, use the curve tool and apply it to the shape of the jeepney to isolate the color and also so that the colors won't mix. Then once you selected the jeepney, you can now enhance the whites. Adjust also the softness of the tool so it wont look sharp. By the way, I also added another curve to the window. Then after that, like what we do in the first example, you can now track it. You can manually adjust the points if its off.
So here is the image after. It looks more dramatic/cinematic than before. More appealing and emotion catching than the way it used to look like.


No comments:
Post a Comment